AutoLisp Chapter - 2

AutoLisp Chapter - 2
Site menu


Login form


Search


Site friends
  • Create your own site


  • Statistics

    Total online: 1
    Guests: 1
    Users: 0


    Welcome, Guest ยท RSS 16 September 2024
    AutoLisp Tutorial for Intermediate
     

    Chapter - 2
     
    Topics Coverd In this Chapter
    • Understanding about Lists.
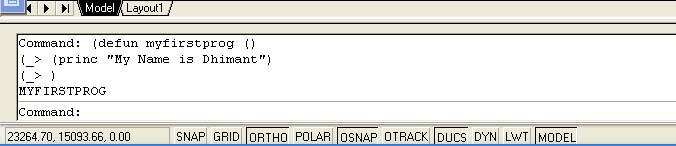
    •  Use defun to make function
    • Save Program on Hard Disk
    • Load Lisp file from Hard Disk
    • User Inputs
    • Using Comments


    you learn AutoLisp Basic's in chapter-1. now in this section we learn about lists and to get inputs from user.
      
    Understanding about Lists 
     
    To create List type this at command line
     
    (Setq var1 (list "Item1" "Item2" "Item3" "Item4"))
     
    to see the var1 value type
     
    !var1
     
    ("Item1" "Item2" "Item3" "Item4")  will be returned
     
    Now suppose you want to get the first item of the list and assign it to var2
     
    (setq var2 (car var1))
     
    to see the var2 value type
      
    !var2
     
    "Item1" will be returned. car returns the first element of Lists.
     
    Now try this
      
    (setq var6 (cdr var1))
      
    ("Item2" "Item3" "Item4"). and cdr returns list except the first element.
     
    Now type this and see what happened
     
    (setq var3 (cadr var1))
     
    now cadr means first use cdr and then use car -> (car (cdr var1))
     
    "Item2" will be returned
     
    Now type this and see what happened. (car (cdr (Cdr var1)))
      
    (setq var4 (caddr var1))
     
    "Item3" will be returned
     
    this means (car (cdr (Cdr var1))) = (caddr var1)
     
    Now type this and see what happened
      
    (setq var5 (cadddr var1))
      
    "Item4" will be returned 
     
    now look about list containing a list then what happend
     
    type this
     
    (setq list1 (list (list "A" "B") "C" "D"))
     
    (("A" "B") "C" "D") will be returned
     
    If you want to get "A" then use this syntex
     
    (caar list1)
     
    If you want to get "B" then use this syntex
      
    (cdar list1)
     
    ("B") will be returned, But we want to get only "B" Not ("B") as list. to do this type as below
     
    (cadar list1)


    Use defun to make Functions
      
    In this section we will learn to create user defined functions. user defined functions are defined by two ways
      
    Example 1 : (defun myprog () (princ))
    Example 2 : (defun c:myprog () (princ))
      
    first we create our first program with use of example 1. To do so we will use AutoLisp's own function "Princ". Princ is use for Print somethig on autocad's command prompt. by this you can notify user to something or give information at the middle of the program. now look this.
      
    (defun myfirstprog ()
    (Princ "My Name is Dhimant")
    )
      
    It look like below image


    To run Function you should type (Functionname) at command prompt. we use myfirstprog as Function Name. so type this
     
    (myfirstprog)
     
    you will see somthing like this.
     
     
    When an autolisp execute it print My Name is Dhimant  at command prompt. but you see it is printed two times. Why ? because the program echoed the last statement to the command line. to corract this add blanc princ and then run this.
     
    (defun myfirstprog ()
    (Princ "My Name is Dhimant")
    (princ)
    )
     
    now run this and you get a single My Name is Dhimant  at command prompt. now we will use C: in defun function. when you use C: in defun you can execute the function like autocad's built in command. like Line. you do not need paranthesis to run function. now test this
     
    (defun C:myfirstprog ()
    (Princ "I live in Green city")
    (princ)
    )
      
    now type (myfirstprog) at command prompt. you see My Name is Dhimant. why ? because we use C: in our function. thus our second function is defferent with first. so you want to test second function you must type myfirstprog without paranthesis and you will get I  live in Green city as result.
      

    Save program on disk for Later Use
      
    We learn to create functions in previous lesson. we use command prompt for this. but it has limit. when you Exit autocad your functions are expier and no longer available. if we save it to hard disk we will use it later. to save AutoLisp file on Hard Disk there are two ways available. first use with NotePad, and second AutoCad's Visual Lisp Editor. so we first use Notepad to save our program. I assume you have Windows operating system for the following instruction.
     
    Go to Start -> Run -> Type Notepad and press ok.
     
    now Notepad should open. Now type as below in Notepad.
     
    (defun C:myfirstprog ()
    (Princ "AutoCad")
    (princ)
    )
     
    now go to file manu of notepad and press Save. select the directory where you want to save your program. and exit Notepad.
     

    Load program From Hard disk
      
    to Load AutoLisp program in Autocad Go to Tools -> AutoLisp -> Load Application... Go to the directory where you save Your program and then press Load Button and then after close button to exit the command. now Run your program and test it.

    Ask User for Input
     
    Functions for Assigning Values to Variables

    you will most often want to get information from the drawing area of the AutoCAD screen. AutoLISP offers a set of functions just for this purpose. These functions are characterized by their GET prefix. Below Table shows a list of these Get functions along with a brief description.

    Functions that pause to allow input

    FUNCTION

    DESCRIPTION

    Getpoint Allows key or mouse entry of point values. This always returns values as lists of coordinate values.
    Getcorner Allows selection of a point by using a window. this function requires a base point value defining the first corner of the window. The window appears, allowing you to select the opposite corner.
    Getorient Allows key or mouse entry of angles based on Units command setting for angles. Returns values in radians.
    Getangle Allows key or mouse entry of angles based on the standard AutoCAD compass orientation of angles. Returns values in radians.
    Getdist Allows key or mouse entry of distances. This always returns values as real numbers regardless of the unit format in use.

    To see how one of these functions works, try the following exercise.
     
    (setq pt1 (getpoint))
     
    This expression blanks the command line and waits until you enter a point. Just as with any standard AutoCAD command that expects point input, you can enter a relative or absolute point value through the keyboard or pick a point on the drawing area using the cursor. The coordinate of the point you pick will become the value assigned to the variable Pt1 in the form of a list.
     
    To Check the value of pt1 by entering the following:
     
    !pt1
     
    The value i.e. (4.0 5.0 0.0) is returned and the command prompt appears once again

    Notethat a Z coordinate value of 0.0 was added and that all the elements of the coordinate list are reals.

    Adding Prompts

    All these Get functions allow you to create a prompt by following the function with the prompt enclosed by quotation marks. The following demonstrates the use of prompts in conjunction with these functions.
     
    Enter the following expression:
     
    (setq pt1 (getpoint  "Pick the first point :"))
     
     The following prompt appears:
     
     Pick the first point : 
     
    Move your cursor and pick a point on screen.
     
     The Get functions allow you to specify a point from which the angle, distance, or point is to be measured.
     
    Enter the following:
     
     (setq pt2 (getcorner pt1 "Pick the opposite corner :")) 
     
    the following prompt appears:
     
     Pick the opposite corner:
     
    Pt1 is the point variable that holds the coordinate for the last point you picked. A window appears from the coordinate defined by Pt1.
      
    Now Issue the line command and at the From point prompt, enter:
      
    !pt1

    A rubber-banding line appears from the point previously defined as pt1 just as if you had selected that point manually.

    Now enter the following:
     
    !pt2

    A line is drawn from the point stored by pt1 to the point stored by pt2.

     
    now we are going to wright program of above exersice and create a rectange. type following in notepad, save it and load to Autocad
     
    (defun c:BOX1 ( / pt1 pt2 pt3 pt4 )

    (setq pt1 (getpoint "Pick first corner: "))

    (setq pt3 (getcorner pt1 "Pick opposite corner: "))

    (setq pt2 (list (car pt3) (cadr pt1)))

    (setq pt4 (list (car pt1) (cadr pt3)))

    (command "line" pt1 pt2 pt3 pt4 "c" )
     
    )
     
    don't want to type ? don't worry download it.
     
    Now you just defined new command Named Box1. to test type Box1 at command prompt
     
    You can see a rectange was drawn.

    Using Comments

    It often helps to insert comments into a program as a means of giving a verbal description of the code. below example shows the box program including comments. The comments start with a semicolon and continue to the end of the line. When AutoLISP encounters a semicolon, it will ignore everything that follows it up to the end of the line. Using the semicolon, you can include portions of your Pseudocode as comments to the program code.

      
    ; Function to draw a simple 2 dimensional box
    ; -------------------------------------------------------------------
    (defun c:BOX (/ pt1 pt2 pt3 pt4) ;define box function 
    (setq pt1 (getpoint "Pick first corner: ")) ;pick start corner
    (setq pt3 (getpoint pt1 "Pick opposite corner: ")) ;pick other corner 
    (setq pt2 (list (car pt3) (cadr pt1))) ;derive second corner 
    (setq pt4 (list (car pt1) (cadr pt3))) ;derive fourth corner 
    (command "line" pt1 pt2 pt3 pt4 "c") ;draw box) ;close defun  
    ;Function to display relative XY coordinates in status line 
    ;----------------------------------------------------------------------